How to Make a Wine Barrel Chair (Cutting & Safety Tips)
Why a Wine Barrel Chair?
Let’s be honest: anyone can buy a patio chair from the store. They all look kind of the same — aluminum frames, synthetic cushions, mass-produced and forgettable. But a wine barrel chair? That’s on a whole different level.
It’s rustic, it’s charming, and it practically invites people to sit down. The natural curve of the staves hugs your back, the hoops give it that rugged industrial edge, and every single chair carries history. These barrels have spent years — sometimes decades — aging fine wines. When you cut into one, you’re not just making furniture, you’re unlocking a story.
The first time I built one, I was nervous. Cutting into a solid oak barrel felt… wrong, almost disrespectful. But once I finished sanding, sealing, and setting it up, I realized: this chair wasn’t destroying the barrel’s history, it was extending it. Now, instead of being forgotten in a cellar, that barrel was part of my home, part of my family gatherings.
But here’s the thing: making a barrel chair isn’t like slapping together a flat-pack chair from IKEA. Barrels are tricky. They’re held together by hoop tension, not screws or glue. Cut wrong, and the whole thing can collapse on you. That’s why this guide is about how to build one and how to do it safely.
What You’ll Need
Before you start, gather your tools and materials. A barrel chair build is way smoother if you’re not stopping mid-cut to rummage for something.
- 1 reclaimed oak wine barrel (look for solid staves, no huge gaps, and hoops that are snug)
- Saw — reciprocating saw for curves, circular saw for straighter cuts
- Drill & screws, bolts, or rivets (to lock staves to hoops before cutting)
- Clamps (so the barrel doesn’t roll while you’re working)
- Sander or sandpaper (80, 120, and 220 grit)
- Rasp or file (for shaping rounded edges)
- Wood filler (optional, for sealing cracks)
- Finish (polyurethane, varnish, or tung oil depending on look)
- Safety gear: goggles, gloves, dust mask, and hearing protection
Optional extras: cushions, upholstery, or memory foam if you want comfort on par with Oak Wood Wine Barrels’ oak barrel dining chair with memory foam upholstery.
Pro Tip 💡: Don’t skimp on safety gear. Oak is dense, the hoops spark when cut, and sawdust gets everywhere. I’ve ended up with oak splinters under my fingernails — not fun. Gloves are your friend.
Step 1: Reinforce Before Cutting
This is the golden rule. Barrels aren’t nailed or glued together. They’re puzzle pieces — staves held tight by metal hoops. When you cut into one, that tension shifts, and without reinforcement, it can explode into a pile of curved boards.
Here’s what to do:
- Drill screws, bolts, or rivets through each hoop into the staves.
- Work your way around the barrel.
- Make sure every hoop is secured.
Once reinforced, your barrel will stay intact no matter where you cut.
Pro Tip 💡: Use stainless steel screws. They won’t rust in outdoor weather, and they’ll keep your chair sturdy for years.
Step 2: Pick Your Style
There are a few different styles of barrel chairs. It’s worth deciding upfront:
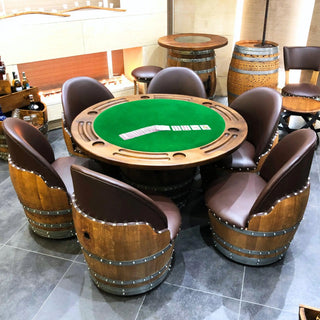
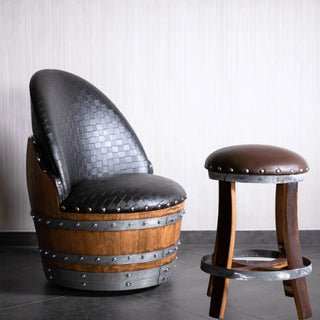
- Half-barrel vertical cut. Saw the barrel lengthwise down the middle. Each half makes a deep, bucket-like chair. Simple, sturdy, and rustic.
- Cut-out style. Keep the barrel whole, but cut a seat and backrest out of one side. Looks sleek, feels like a lounge chair, and keeps the classic barrel silhouette.
- Stave-rebuild. Disassemble the barrel and rebuild the staves into a chair. This is advanced — a project for those who want maximum creative control.
For beginners, the cut-out style strikes the best balance of rustic charm and doable cuts. That’s what we’ll focus on here.
Step 3: Plan and Mark Your Cuts
Here’s where you need to slow down. Before picking up the saw, visualize your chair.
Grab chalk or painter’s tape and mark your cuts:
- A wide cut across the front (for the seat).
- A section cut from the top (for the backrest).
Leave enough wood for stability. If you cut too much, you lose strength; too little, and the chair’s uncomfortable.
Pro Tip 💡: Sit on the barrel before cutting (carefully). Use your body to test where the seat height feels right. Mark from there. It’s more reliable than guessing with a tape measure.
Step 4: Make the Cuts
Clamp the barrel so it doesn’t roll away mid-cut. Grab your reciprocating saw with a wood/metal blade (you’ll be cutting through hoops as well as oak).
Start slow. Let the saw do the work. Oak is tough — it’ll resist, and sparks will fly when you hit metal. That’s normal. Keep your cuts steady, following your chalk or tape lines.
Once you’ve cut out the section, gently remove the piece. Congrats — you just created the basic chair shape.
Pro Tip 💡: Cut just outside your lines. You can always sand or rasp back to the final shape, but you can’t add wood back if you cut too far.
Step 5: Sand & Shape
This is the stage where your chair goes from “rough cut” to “furniture.”
- Start with 80-grit sandpaper to smooth sharp edges.
- Move to 120-grit for refining.
- Finish with 220-grit for a silky touch.
Focus on areas where skin will touch: seat edges, armrests, and backrest. Round them over slightly with a rasp before sanding for a more comfortable feel.
Pro Tip 💡: Run your hand along every surface after sanding. If it catches, sand again. Smooth wood = no splinters in shorts season.
Step 6: Seal & Protect
Oak barrels are tough, but they need protection from sun, rain, and wear.
Choose your finish:
- Polyurethane: ultra-durable, glossy, good for outdoor exposure.
- Tung oil: natural, rustic, warm glow. My favorite for keeping the wood’s character.
- Varnish: a classic balance of durability and shine.
Apply 2–3 coats minimum. Let each one dry fully before sanding lightly and reapplying. Don’t forget to seal the cut edges — they’re the most vulnerable to water damage.
Pro Tip 💡: Wipe on the first coat with a rag to really work it into the grain, then switch to a brush for smoother top coats.
Step 7: Add Comfort
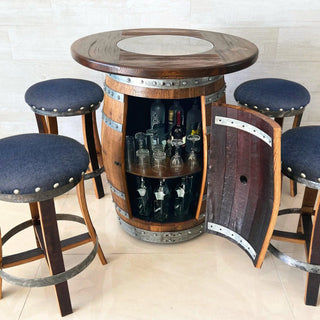
Raw oak looks beautiful, but let’s be real — it’s not the coziest to sit on for an hour. Consider:
- Adding a cushion or upholstered pad.
- Using outdoor fabric if your chair will live outside.
- Memory foam for real comfort, like Oak Wood Wine Barrels’ captain barrel chair (luxury seating).
Even a simple throw pillow can make a world of difference.
Step 8: Personalize It
Here’s where your creativity shines:
- Stencil a design onto the backrest — initials, grapevines, a family crest.
- Brand it with a hot iron for a winery-inspired look.
- Add casters if you want it mobile.
- Paint the hoops black, bronze, or even a bold color for flair.
I once painted the hoops of a barrel chair matte black, then added a cushion in burgundy fabric. The combo looked sharp, like it belonged in a vineyard tasting room.
Living with a Barrel Chair
Once you’ve got your chair set up, you’ll find it’s more than just a seat. It becomes a story in your home. Guests will gravitate toward it, ask about it, and you’ll end up telling the tale of how you cut, sanded, and sealed it.
And the best part? No two barrel chairs are alike. Yours might have deep purple stains from merlot, while another carries a smoky aroma from whiskey. Every chair is unique, just like every bottle aged inside the barrel once was.
DIY vs Ready-Made
Building a barrel chair is deeply satisfying — but it’s also work. You’ll sweat, you’ll get sawdust in your hair, and you’ll probably swear once or twice when the oak fights back. But when you sit in that finished chair, you’ll feel proud.
If you’d rather skip the battle with saws and splinters, Oak Wood Wine Barrels makes handcrafted options like the blue velvet oak barrel chair, the burgundy oak barrel chair, and the oak barrel dining chair with memory foam upholstery. Same rustic beauty, no workshop required.
Our Links
- Oak barrel dining chair (memory foam upholstery)
- Luxury captain barrel chair
- Blue velvet oak barrel chair
Other Resources to Check Out!
Disclaimer
This blog is written for DIY inspiration and general guidance only. Every barrel is different — age, wood condition, hoop tightness, and stave structure can all vary. Cutting into oak barrels is not without risk and requires proper tools, preparation, and safety precautions.
Always reinforce your barrel with screws, bolts, or rivets before cutting. Always clamp securely to prevent rolling. Always wear goggles, gloves, hearing protection, and a dust mask. Expect sparks when cutting through hoops, and never force your saw through — let the tool work at its own pace.
Oak Wood Wine Barrels cannot guarantee your safety, results, or the longevity of your DIY project. If you’re not confident using woodworking tools, we recommend working with a professional or purchasing one of our handcrafted barrel chairs, designed by experienced makers.
This content is subject to change and is not a substitute for professional woodworking training. Please work carefully, respect your tools, and above all — enjoy the satisfaction of creating something unique, sustainable, and built with your own two hands.