DIY Barrel Makeover: Sanding, Staining and Protecting Your Oak Furniture
There’s something almost poetic about reviving an old oak barrel. Maybe it sat for years in a winery, soaking up the scent of red wine and memories. Maybe it’s been in your backyard through a dozen summers, the finish worn down by sun and rain.
Whatever its story, you can feel it when you run your hand along the wood—the life that’s still in there. It just needs a little love to shine again.
The best part? You don’t have to be a carpenter or a craftsman. All you need is a free weekend, a bit of sandpaper, and the desire to see that oak glow again.
So, if your wine barrel coffee table looks dull, your bar set has lost its sheen, or that old patio piece feels forgotten, grab your tools. We’re about to give it the makeover it deserves.
Why a Barrel Makeover Is Totally Worth It
Here’s the thing about oak—it’s strong, it’s timeless, and it’s honest. It doesn’t hide its age; it wears it like a badge of honor. But over time, even the best oak starts to dry out. The sun fades it, the finish flakes, and suddenly your once-stunning barrel looks tired.
Refinishing it is like giving it a deep breath—a way to bring back that glow and preserve it for years. You’re not just fixing furniture; you’re preserving a little piece of craftsmanship, a little piece of history.
And honestly? Once you see the first glimpse of golden wood peek through after sanding, you’ll understand why people fall in love with restoring oak. It’s addictive.
Step 1: Sanding — Let the Oak Speak Again
Sanding is where the story starts to unfold. Beneath every layer of dust and old finish lies the raw beauty of aged oak waiting to show off again.
You’ll need:
- Sandpaper: 80, 120, and 220 grit
- A palm sander (if you’ve got one)
- A clean, damp rag
Start slow. Breathe. Enjoy it.
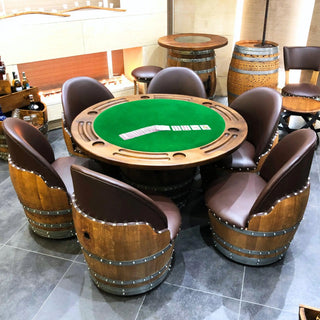
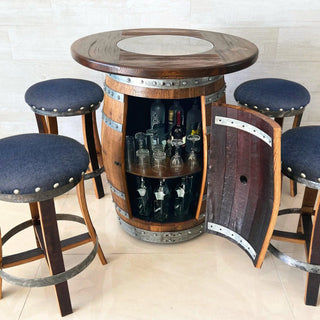
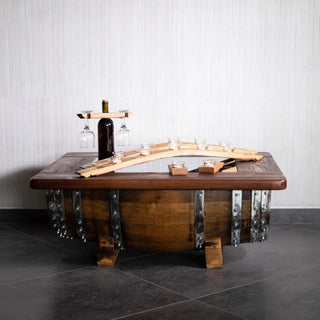
Begin with 80-grit to gently remove the old finish. Follow the curve of the barrel, moving with the grain—not against it. If you’re working on a full set like a wine barrel bar with stools or a coffee table set from Oak Wood Wine Barrels, take your time. Oak doesn’t like to be rushed—it rewards patience.
As the darker, dull layers disappear, switch to 120-grit to start revealing the smooth, caramel tones hiding underneath. By the time you move to 220-grit, the wood will feel buttery beneath your fingertips.
Wipe it down with a damp cloth afterward. When that cloth comes away brown and the barrel starts to shimmer in the light, you’ll know you’re doing it right.
Step 2: Staining — Giving It Character (and Soul)
Staining is where the oak’s personality shines. Do you want something warm and rustic? Or deep and moody, like an old whiskey cellar? The color you choose sets the tone—literally.
Warm & Rustic:
Go for golden oak, amber, or honey stains. These tones bring out that farmhouse glow—perfect for barrel dining sets or rustic home bars.
Bold & Modern:
Try walnut, espresso, or charred oak stains for a darker, sleeker look. These finishes pair beautifully with black metal hoops or industrial-style décor.
Simple & Natural:
If you’re a purist (I get it), skip the stain. A clear Danish oil or tung oil will bring out the grain’s natural color—soft, golden, and effortlessly elegant.
How to apply it:
- Stir the stain—don’t shake. (You don’t want bubbles.)
- Apply it evenly with a lint-free cloth, moving with the grain.
- Let it sit for 5–10 minutes depending on how rich you want the color.
- Wipe away the excess with a clean cloth.
- Let it dry completely before sealing.
Here’s a tip I learned the hard way: always test your stain on the bottom or underside of your barrel first. Reclaimed oak is unpredictable—every piece absorbs color differently. That’s part of what makes it so special.
Step 3: Protecting — The Finish That Lasts
You’ve sanded. You’ve stained. Now it’s time to protect your masterpiece. This is what keeps the wood from drying, cracking, or fading again.
For that hand-rubbed, natural glow:
Go with tung oil. It seeps deep into the oak, hardens naturally, and gives that soft sheen that feels like silk when you touch it.
For maximum durability indoors:
Use a satin polyurethane finish. It’ll add a hint of shine and protect against water rings and everyday use.
For outdoor warriors:
If your barrel furniture lives outside, don’t even hesitate—marine varnish is the way to go. It’s the same stuff used on boats, so it can handle whatever nature throws at it.
How to do it:
- Apply thin, even coats with a soft brush or lint-free rag.
- Let each coat dry completely (24 hours minimum).
- Lightly sand with 220-grit between coats.
- Repeat two to three times for that flawless finish.
When you’re done, step back and take a look. That shine? That glow? That’s the reward. It’s oak at its absolute best.
Step 4: The Little Details Everyone Forgets
Here’s where the pros separate themselves from the amateurs.
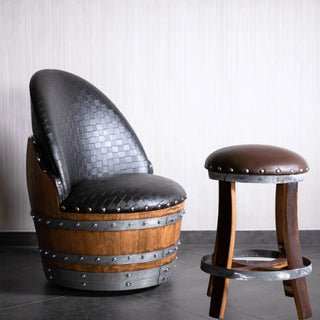
- Polish the metal hoops. Use fine steel wool to remove rust and bring back that soft metallic shine. Or, if you prefer a modern look, hit them with matte black spray paint for contrast.
- Check the base. Add felt pads or rubber stoppers to the bottom if your barrel’s indoors—it’ll protect your floors and prevent slipping.
- Mind the cracks. Tiny gaps between staves can be filled with natural wood filler before sealing—it keeps moisture out and the barrel tight.
These little touches take your barrel from “nice project” to “wow, where did you buy that?”
Step 5: Love It, Maintain It, Enjoy It
Refinishing a barrel isn’t a one-time thing—it’s a relationship. The more love you give it, the better it looks as the years go by.
Here’s my rule of thumb:
- Wipe it down monthly with a soft, dry cloth.
- Reapply oil or varnish every 6–12 months.
- Keep it out of direct sunlight if you can.
- If it’s outside, elevate it slightly to prevent moisture buildup.
You’ll be amazed at how oak ages when it’s cared for—it doesn’t just stay beautiful, it becomes richer, deeper, more alive.
Our Links
- Learn more from our Oak Barrel Restoration & Care Guides.
- Browse our handcrafted wine barrel furniture and décor collections.
- Explore our barrel bar sets, coffee tables, and reclaimed oak creations for design inspiration.
Other Resources to Check Out!
- Fine Woodworking: The Right Way to Refinish Oak
- The Cooper’s Guild: Crafting & Restoring Wine Barrels
- Wood Magazine: DIY Guide to Oil and Varnish Finishes
The first time I refinished a barrel, I remember standing back, wiping my hands on a rag, and just staring at it for a minute. The surface gleamed. The wood looked alive again. The metal hoops caught the light. It wasn’t just “fixed”—it had a soul again.
That’s the thing about working with real oak. It’s not about perfection; it’s about connection. Every nick and grain tells a story. And when you sand, stain, and seal it yourself, you become part of that story.
So next time you look at that old barrel and think it’s past its prime, think again. With a little care, it’s got decades left in it—and trust me, it’ll thank you for the attention.
Disclaimer
This article is intended for educational and informational purposes only. The techniques described are based on hands-on woodworking experience and general refinishing practices. Always wear protective gear, ensure good ventilation, and test stains and finishes on a small area first.
Oak Wood Wine Barrels assumes no responsibility for injury, property damage, or variations in results from DIY restoration projects. Product recommendations and methods may evolve as craftsmanship and materials advance.
For professional restoration—or to explore our exclusive line of handcrafted oak and wine barrel furniture—visit OBARREL.COM.
Because every barrel deserves a second chance to shine.