The Ultimate Guide to Restoring Old Oak Barrels — Sanding, Staining and Sealing Tips
You know that feeling when you stumble across an old oak barrel—dusty, faded, maybe even a little beat up—but you can tell it’s got stories? Maybe it sat in a vineyard once, soaking up Cabernet. Maybe it’s been rolling around someone’s garage for a decade. Whatever its past life was, one thing’s for sure: old barrels have soul.
Restoring one isn’t just a DIY project—it’s an experience. You’re taking something timeworn and breathing life back into it. It’s the smell of oak dust, the way the grain starts to peek through as you sand, and that deep satisfaction when the light hits your final coat of finish just right.
I’ve restored more barrels than I can count—from winery cast-offs to full-blown coffee tables—and let me tell you, there’s nothing like watching an old piece of oak come alive again. So grab your gloves and a little patience. Here’s the full, honest, hands-on guide to making your old barrel look stunning again.
Why Old Oak Barrels Deserve a Second Life
Let’s be real—oak barrels aren’t just furniture. They’re little pieces of history. Each one’s soaked in wine, whiskey, or memories of laughter around a backyard table.
But time can be rough on oak. It dries out, loses its glow, maybe even cracks a little. The metal hoops rust, the finish fades, and suddenly that once-beautiful piece looks like it belongs in a salvage yard instead of your living room.
The truth? Under all that wear is reclaimed oak perfection waiting to shine again. You just need to know how to coax it out. The secret is simple—don’t erase the age, enhance it. The scratches and scars? They’re part of the charm.
That’s what we do every day at Oak Wood Wine Barrels—we don’t just sell furniture, we give barrels a second story.
Step 1: Sanding — The Moment of Truth
I always say sanding is where you meet the wood. You start removing years of grime, and suddenly that grain starts winking at you from underneath.
Start Gently
Grab 120–150 grit sandpaper and work your way around the barrel. Use a light touch—oak is tough, but you don’t want to strip its soul away. If the barrel still has wine stains, varnish, or old finish, let the sander do the work. Don’t rush it.
For the rounded parts between hoops, I prefer good old-fashioned hand sanding. It’s slower, sure, but you can feel the wood that way—the smoothness, the warmth. I usually put on some music, take a deep breath, and just get lost in it.
Don’t Aim for Perfect
If you sand away every mark, you’ll lose what makes that piece unique. Keep the small imperfections—the scuffs, the uneven tone. That’s where the character lives.
Step 2: Staining — Setting the Mood
Staining is where your barrel starts finding its personality.
Ask yourself: What vibe do you want?
Do you want something rustic and golden, or something sleek and dark like a whiskey lounge?
For Warm, Rustic Tones
Go with amber, honey, or golden oak. It’ll make the wood glow like it’s been kissed by sunlight. Perfect for farmhouse-style décor or wine barrel dining tables.
For Bold, Modern Vibes
Try walnut or espresso stains. They deepen the grain and give off that luxury whiskey barrel furniture feel.
For Natural Simplicity
Honestly, sometimes I skip the stain altogether. I love using a clear oil or matte finish that just enhances the natural tone. Oak has this quiet, confident beauty when you let it speak for itself.
Pro tip: Gel stains are a lifesaver for barrels—they go on evenly and don’t drip into cracks or seams. Just make sure to test the color on the bottom first.
Step 3: Sealing — The “Ahh” Moment
Once the stain’s dry, it’s time for the final step: sealing. This is where everything comes together—the shine, the protection, the payoff.
For indoor barrels like coffee tables or bar sets, I swear by a satin polyurethane. It’s tough, not too shiny, and it gives your wood that subtle, buttery glow. Two or three coats, light sanding in between, and it’ll look like it was finished by a pro.
For outdoor barrels—like planters or patio tables—go with a marine-grade varnish. It’s the stuff boats use. Rain, sun, humidity… it can take it all.
And if you want to go fully natural, tung oil or Danish oil gives a rich, hand-rubbed look. It’s more work—you’ve got to buff it in slowly—but trust me, it’s worth every minute.
That first time you step back and see the wood glowing again under the light? That’s a little piece of magic.
Step 4: The Details That Make It Pop
Don’t forget the hardware—the hoops, rivets, and any metal accents. They’re like the jewelry of your barrel.
If the metal’s rusty, grab a wire brush or some fine sandpaper and polish it up. You can spray a bit of clear lacquer afterward to keep the shine.
And if you’ve got a personalized engraved barrel top or logo, tape it off before staining or sealing. You’ll thank yourself later. A little extra care here makes the final look go from “cool DIY project” to “custom heirloom.”
A Few Words of Workshop Wisdom
- Never rush the process. Let the stain and sealant cure fully—it makes a world of difference.
- Keep your workspace clean; oak dust gets everywhere.
- If your barrel lives indoors, reapply a light coat of oil every year or so.
- For outdoor barrels, I always recoat twice a year—it keeps that deep color locked in.
The best part of restoration is watching your effort age gracefully over time. Every time you walk by that finished piece, you’ll remember the smell of the wood, the sound of the sandpaper, and that quiet pride that comes from doing it yourself.
Our Links
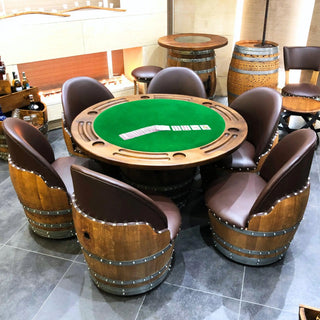
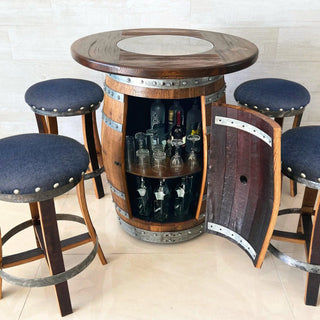
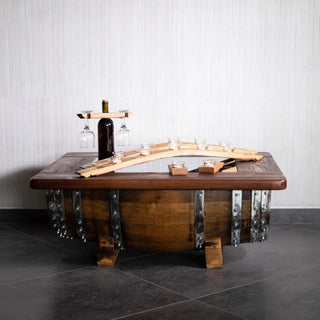
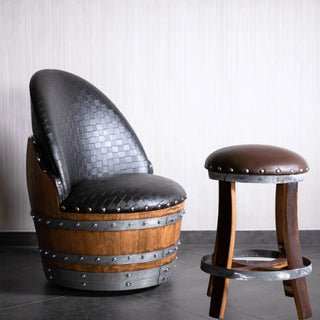
- Explore our reclaimed oak barrel furniture collection for design inspiration.
- Discover our handcrafted barrel tables, bars, and seating sets built from real wine barrels.
- Learn more about luxury oak furniture restoration and custom finishes at Oak Wood Wine Barrels.
Other Resources to Check Out!
- Fine Woodworking: Secrets to a Perfect Oak Finish
- The Cooper’s Craft: Barrel Restoration Techniques
- Popular Woodworking: The Complete Guide to Furniture Refinishing
Restoring a barrel isn’t just about making something “look new.” It’s about honoring its story—those years in a winery, the weathered texture, the scent that still whispers of old cellars.
So when you sand, stain, and seal, do it with patience. Do it with love. Because when that oak starts to glow again, you’ll realize—this isn’t just furniture. It’s legacy.
Disclaimer
This guide is shared for informational and educational purposes only. All techniques described here are based on personal woodworking experience and general restoration practices. Always use protective gear (especially when sanding or sealing), work in a ventilated space, and test all finishes on a small area first.
Oak Wood Wine Barrels is not liable for injuries, material damage, or unintended outcomes from DIY restoration projects. Product materials, finishes, and techniques may evolve as we continue to refine our craftsmanship.
For professional restoration or to browse handcrafted, fully restored oak and wine barrel furniture, visit OBARREL.COM — where every barrel tells its story, one finish at a time.