How to Make a Wine Barrel Table (DIY Guide)
Why a Wine Barrel Table?
There’s a charm to barrels that other pieces of wood just don’t have. Maybe it’s the curves — staves bending gracefully, held tight by those iron hoops. Maybe it’s the patina, the wine stains, the little nicks that tell you this barrel has lived. Whatever it is, the moment you roll one into your garage or workshop, it feels like you’re working with more than raw material. You’re working with history.
And let’s be honest — wine barrel tables just look fantastic. They’ve got rustic personality baked in. Put one in a living room, and it instantly becomes a conversation piece. Set one out on a patio, and suddenly the space feels like an outdoor wine lounge. Drop one into a basement bar or man cave, and it screams character without you having to try too hard.
I’ve built a few of these over the years, and every time, I end up standing back at the end thinking, “That barrel looks even better as a table than it did in the winery.” And the beauty of it? You don’t need to be a master carpenter. With some patience, a few tools, and a love for the process, you can make one yourself.
What You’ll Need
Alright, let’s talk gear. You don’t need a full woodworking shop, but you do need the basics.
- 1 oak wine barrel (reclaimed if possible — check that the staves are tight and hoops aren’t rusted out)
- Saw (circular saw is easiest for straight cuts, but a jigsaw or reciprocating saw works too)
- Drill & screws, rivets, or bolts (for reinforcing hoops to staves)
- Sandpaper or power sander (80, 120, and 220 grit)
- Wood filler (optional, to fill big gaps or cracks)
- Finish/sealer (polyurethane for durability, varnish for shine, or tung oil for that hand-rubbed, rustic look)
- Paintbrushes or lint-free rags (for applying finish)
- Safety gear: goggles, gloves, dust mask — don’t skip this. Oak dust is no joke.
- Tabletop: could be glass (round sheet is sleek), a cut wood round, or the original barrel head
Optional fun stuff: casters (wheels), LED lights for inside, hinges if you want the top to open, or metal trim for style.
Pro tip: if you don’t want to start from scratch, Oak Wood Wine Barrels already sells finished options like the barrel coffee table chest or wine barrel coffee table with removable glass top. But if you’re here, I’m guessing you’re in it for the sawdust and satisfaction.
Step 1: Stabilize the Barrel Before Cutting
Here’s where a lot of first-timers mess up. Wine barrels are held together by nothing but pressure — the hoops squeezing the staves. The second you start cutting, that tension is released, and if you’re not careful, your barrel will “pop” apart like a spring-loaded trap. I learned that the hard way once and ended up with a pile of loose oak planks. Don’t be me.
Before cutting, drill screws or bolts through the hoops into the staves. Do this all the way around, at every hoop. If you want to get fancy, use rivets — they look great and do the job. This reinforcement keeps the barrel solid, even after you cut it. Think of it as giving the barrel a belt and suspenders before surgery.
Step 2: Decide on Your Table Style
This is the fun part. There’s more than one way to turn a barrel into a table, and it depends on what you want.
- Full barrel table: Leave the barrel whole, put a round top on it, and boom — you’ve got a tall table that’s perfect for standing cocktails or a bistro setup.
- Half barrel coffee table: Cut the barrel horizontally, so you’ve got a shorter base. Add a top, and it’s ideal for a living room or patio.
- Quarter barrel console: Cut the barrel vertically, flatten the back, and push it against a wall. Now you’ve got a slim entryway table or console.
My go-to for beginners is the half-barrel coffee table. It’s easier to cut, easy to balance, and sits nicely in almost any room.
Step 3: Make the Cut
Measure twice, cut once. That saying is ten times more important when you’re cutting something round and curved. Use a chalk line or painter’s tape to mark where you’ll cut, all the way around.
If you’re making a half-barrel coffee table, measure from the bottom up so you’re cutting evenly. A wobbly cut will haunt you later when you’re trying to balance a tabletop.
Use a circular saw if you want speed, but don’t rush it. Oak is dense. The hoops will spark when you hit them, so expect a little fight. A reciprocating saw with a metal/wood combo blade can make the job easier if you’re not comfortable wrestling a circular saw around a barrel.
Once you’re through, smooth the edges with coarse sandpaper to take off the roughness.
Step 4: Sand & Smooth
This is where the barrel transforms. Start with 80-grit to knock down rough spots and clean the surface. Move up to 120, then 220 for a smoother finish. Don’t overdo it — you don’t want to erase all the character.
Leave some of the wine stains or marks if you can. They’re the barrel’s fingerprints. I once built a table that had faint purple streaks across the staves from years of cabernet. Everyone who saw it said, “That’s gorgeous. Where’d the color come from?” You can’t fake that kind of authenticity.
Wipe off the dust when you’re done, or vacuum it out of the grain.
Step 5: Add the Top
Here’s where you decide how you want your table to look.
- Glass top: Clean, modern, and lets you see the barrel beneath. You can even put bottles or lights inside for display.
- Wood slab: Rustic and heavy-duty. Cut a round piece, stain it to match, and screw it into the staves.
- Barrel head: The authentic choice. Sand and seal the original barrel head, and it becomes a perfect rustic tabletop.
If you want storage inside (great for blankets, games, or bottles), make the top removable. Hinges are handy, but sometimes just setting the top in place works fine too.
Step 6: Seal & Protect
Now it’s time to bring out the beauty of the wood.
Apply varnish, polyurethane, or tung oil in thin, even coats. I like polyurethane for durability (coffee tables see spills). Tung oil, though, has this hand-rubbed, warm finish that feels very “old world.”
Apply at least three coats, sanding lightly between them with 220-grit. Don’t rush drying time — let each coat cure properly. You’ll see the oak grain come alive under the finish.
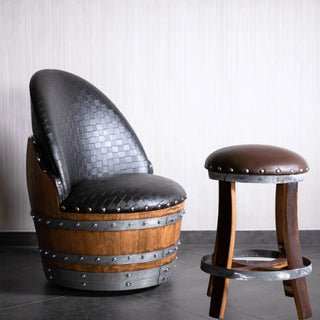
If the hoops look rough, polish them with steel wool or repaint them for a clean black or bronze look. Or leave them rustic and weathered — it depends on whether you want “farmhouse chic” or “industrial modern.”
Step 7: Finishing Touches
Here’s where you make it your own.
- Add casters to the bottom if you want to move it easily.
- Install a shelf inside for storage.
- Drop in LED strip lights if you’re using glass — it’ll glow like a showcase at night.
- Line the interior with cedar planks if you want it to double as a blanket chest.
One friend of mine even cut a half barrel, added a hinged glass top, and filled the inside with corks from bottles he and his wife had shared. Now it’s not just a table — it’s their memory chest. That’s the magic of DIY.
DIY vs Ready-Made
Here’s the truth: making a barrel table is fun. You’ll get a workout, you’ll get dusty, and you’ll feel proud every time you look at it. But not everyone has the tools, patience, or time.
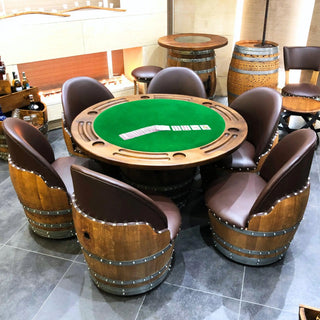
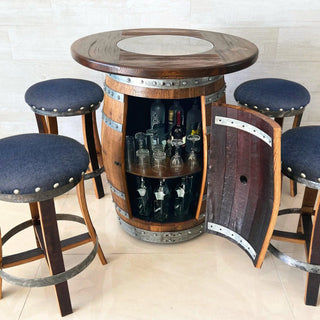
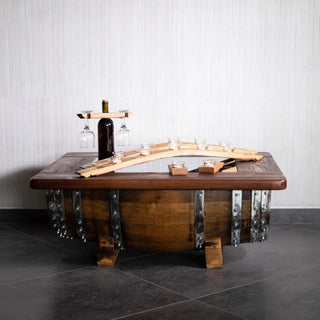
That’s why Oak Wood Wine Barrels also makes finished options like the wine barrel coffee table with removable glass top, the barrel coffee table chest (with storage), or even full sets like the wine barrel round coffee table with 2–4 chairs. You get the rustic charm without the trial and error.
Whether you build or buy, the end result is the same: a table with soul.
Our Links
- Wine barrel coffee table with removable glass top
- Barrel coffee table chest (with storage)
- Wine barrel round coffee table with 2–4 chairs
Other Resources to Check Out!
Disclaimer
This guide is meant for general DIY inspiration. Every barrel is different — some are dry, some are warped, some are fragile. Cutting and working with oak can be dangerous if you don’t reinforce the staves and hoops properly.
Always secure your barrel with screws, bolts, or rivets before cutting. Always wear goggles, gloves, and a dust mask when sanding or sawing. Work in a safe, ventilated space, and never rush.
Oak Wood Wine Barrels cannot guarantee the safety or outcome of individual DIY projects. If you’re not confident with power tools, consider seeking professional help — or skip the build and explore our handcrafted barrel tables made by experienced artisans.
This blog is not professional woodworking or safety advice. It’s meant to share ideas, enthusiasm, and general steps. Your results may vary, and your safety is your responsibility. Build smart, build safe, and most importantly — enjoy the process of turning something old into something new.